
React Native Social Sign in with Apple and Amplify
Problem:
How to add Apple sign-ins to your React Native mobile app using Cognito and Amplify?
Solution:
Adding apple sign in to your React Native app could be tricky. This required many settings on Cognito and Apple. Let’s take a look.
Prerequisite
- Apple developer account with the access of certificate portal
- AWS account with access to creating UserPool, Cognito Identity, Lambda, and IAM.
- Reach-Native 61.5+
- XCode
Setup AWS
Let’s start by setting up our Cognito identity and user pool. To do this please follow steps:
Sign in to AWS console and then go to Cognito service. Make sure you are in the correct region before starting with setting up identity and pool. Once you are at the Cognito home page, you will notice it provides 2 links, Manage User Pool and Manage Identity Pool. Both have their own purpose and we will need to set up both.
Let’s start with UserPool and create a new user pool.
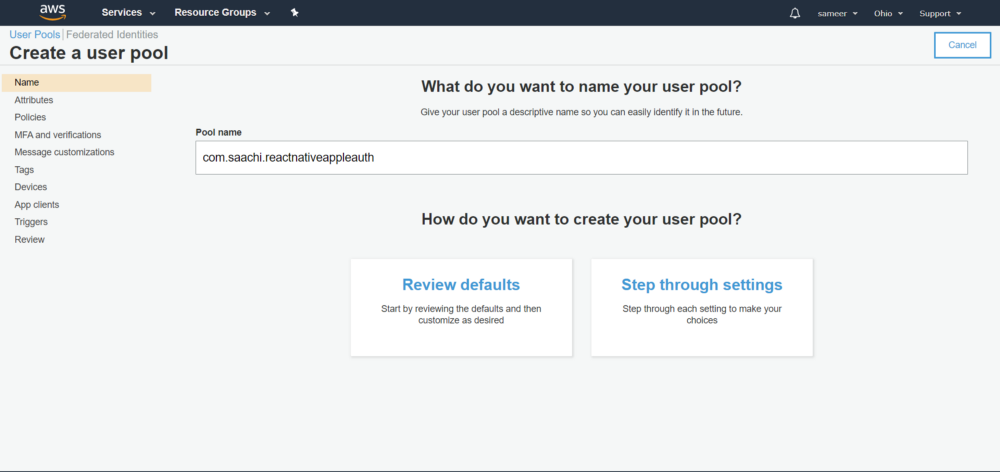
- Input pool name and then choose review defaults.
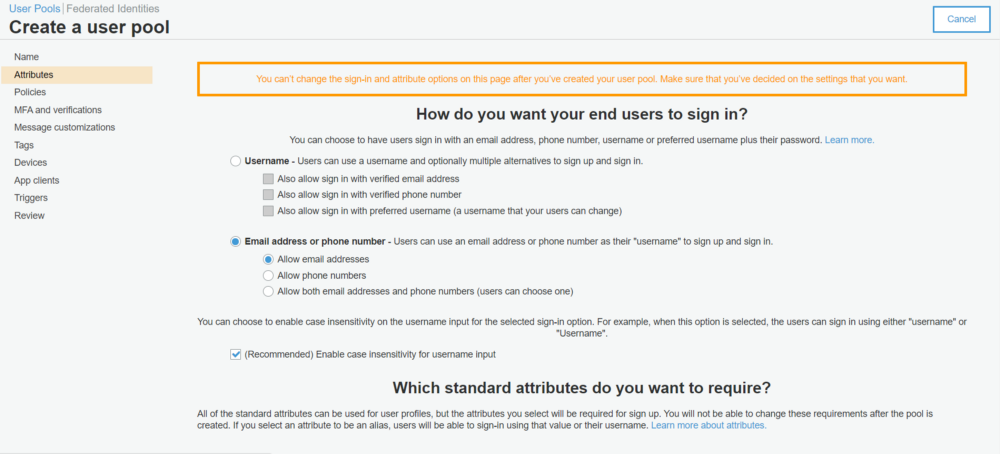
2. Select Attributes from the left menu and update them like following and click on next.
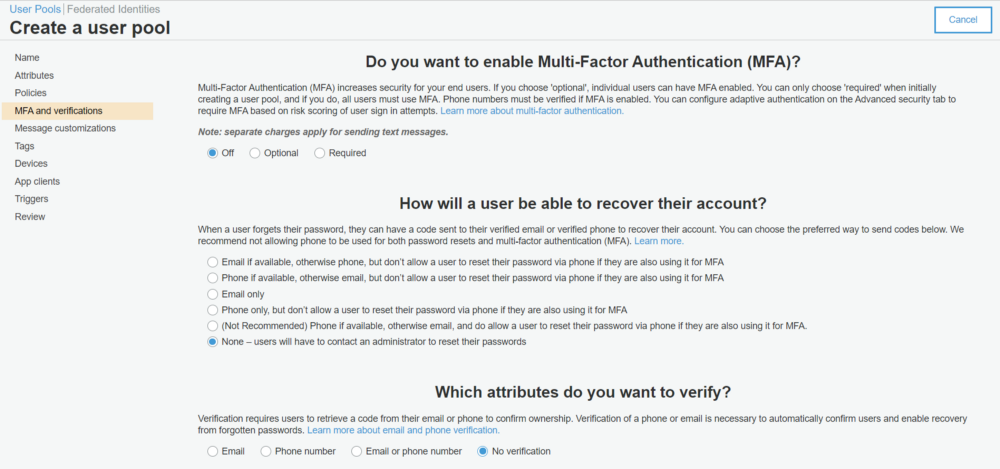
3. The next screen is MFA and verification. In this post, we won’t be verifying users on our side so let’s turn it off. In this case, we don’t need to create any role for SMS so ignore it.
4. Since we are not verifying users we can skip the next screen which is message customization.
5. The next screen is Tags. You can add a tag that helps you in finding the user pool in different AWS services. Click Next.
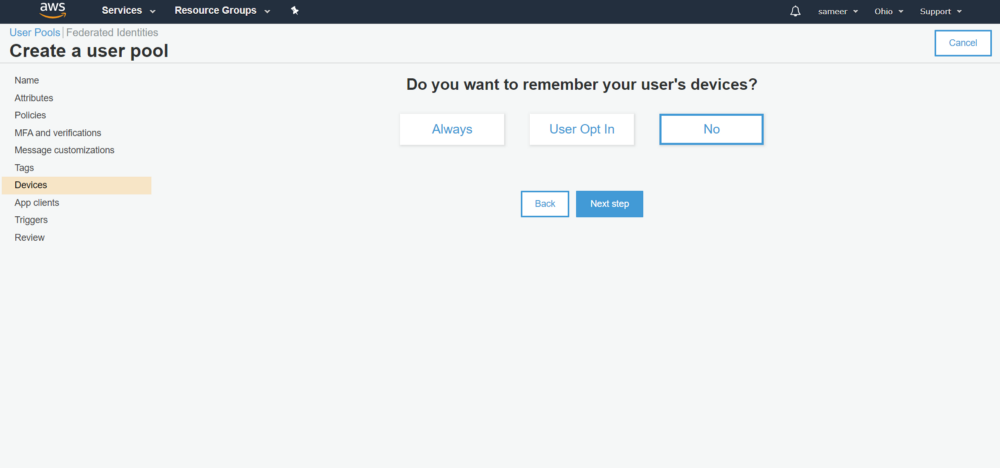
6. The next screen is Devices. You can update it as per your requirement. For this post, we’ve selected “No” as we don’t want to remember the user’s device.
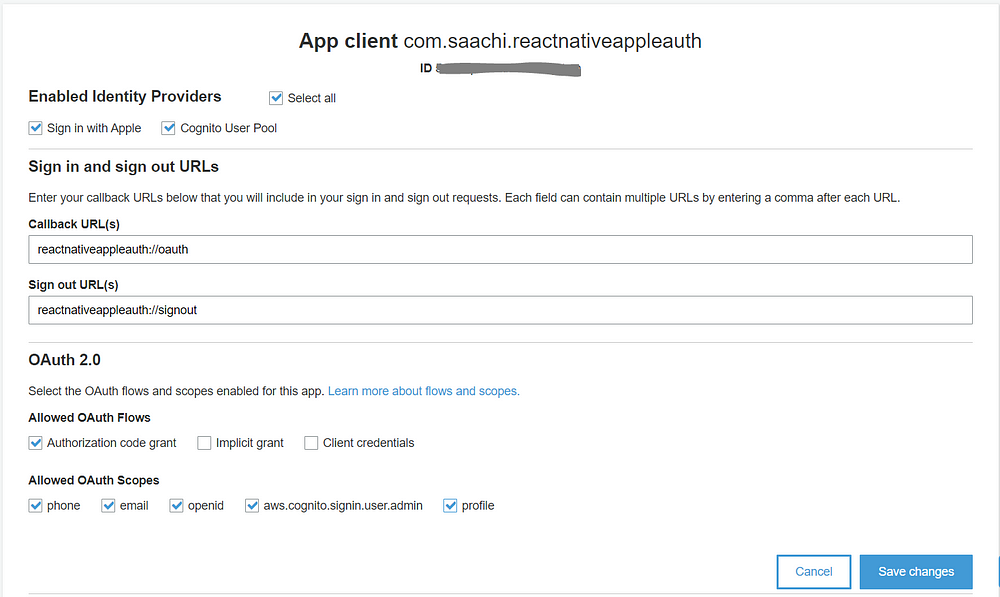
7. The next screen will be the app client. This is an important step. We need this to configure correctly to work with Apple and our app.
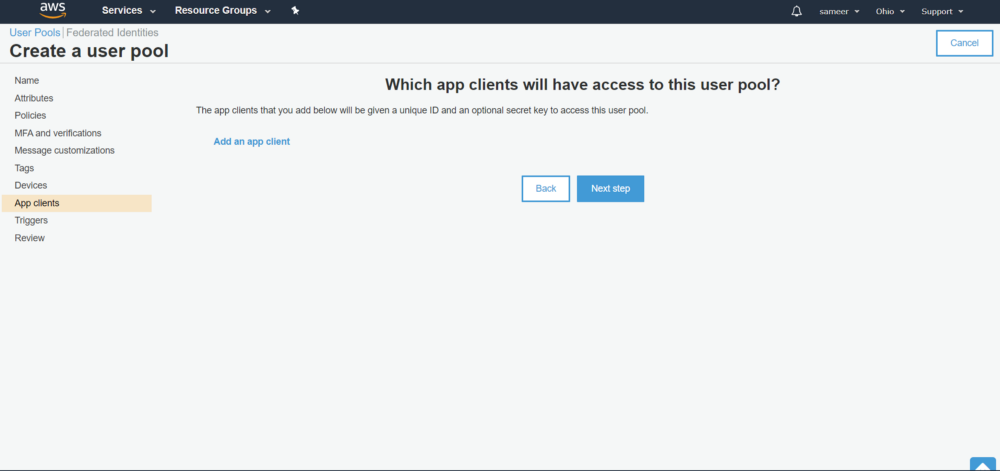
8. Click on Add an app client and update it as follows.
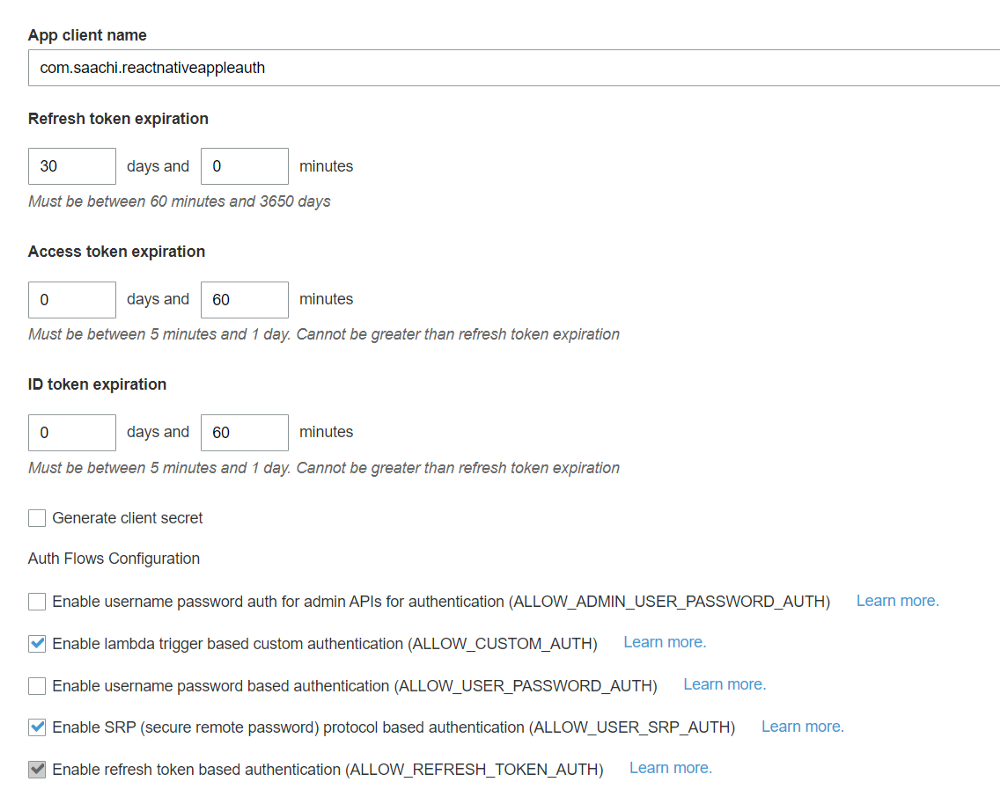
You might notice that we have turned off ‘Generate client secret’. I will explain this later. For now, click on ‘Create app client’ then return to the user pool and click on Create Pool. Your pool is ready. Copy PoolId and App client id, we will need them later.
9. Now we need to set up a domain. Amazon provides an option to use your own web domain or use the Cognito domain. It’s a domain where Apple service will redirect after successful authentication and provide token and other attributes. You can use any name of your wish. I would suggest using your app name here, for example, reactnativeappleauth
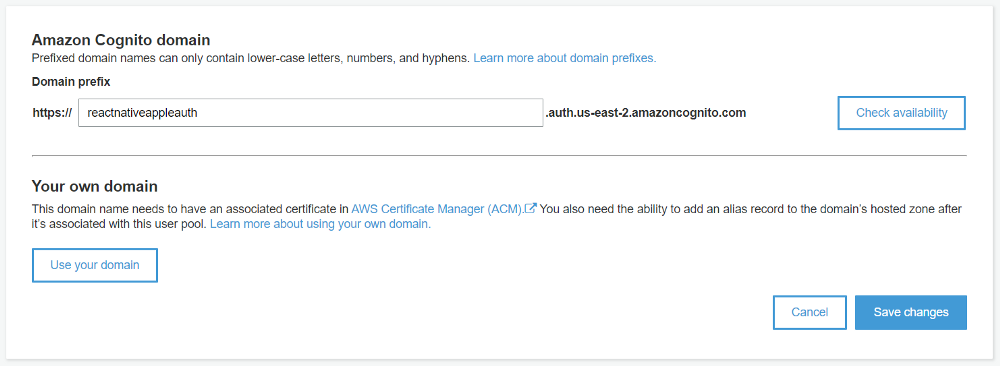
Click on save changes. We are done with User Pool, for now, we will have to visit this later to configure federated settings.
Now let’s configure Apple app id and service id to allow apple to sign in. To do this sign in to your apple developer account and navigate to Certificates, Identifiers & Profiles. Once you are here go to Identifiers.
If you already have app id setup, you can skip to Setup Apple Service Id
Setup Apple App Id
- Select App Id from the right drop-down if you not on App Ids screens
- Click on the + icon next to identifiers.
- Select “App Id” from the list and click on “Continue”.
- Select the “App” type and continue.
- Enter a “Description” and bundle id. Now scroll Capabilities list until you find “Sign In with Apple”. Enable it by checking it. We will leave default settings for now.
- Click on “Continue” and then “Register”.
Setup Apple Service Id
- On Identifiers screen, select Service ID from the right drop-down.
- Now click on the + icon next to identifiers.
- This time select “Services IDs” and click on continue.
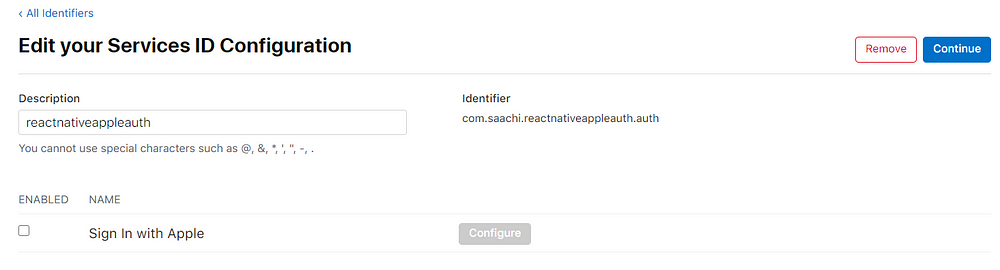
- Input a description. This will appear on the apple sign in prompt so keep it simple and same as your app name. We also need to provide an identifier.
This identifier should extend your app bundle id as below

5. Click on “Continue” and “Register”. After successful registration. It will take you to the “Service Ids” list. Click on the recently create service id. This will take you to below screen
Now enable Sign in with Apple and then click on “configure”. You will get a modal window where we need to provide our domain and redirect URL. We have already created this when we had set up our UserPool. Let’s use them here now
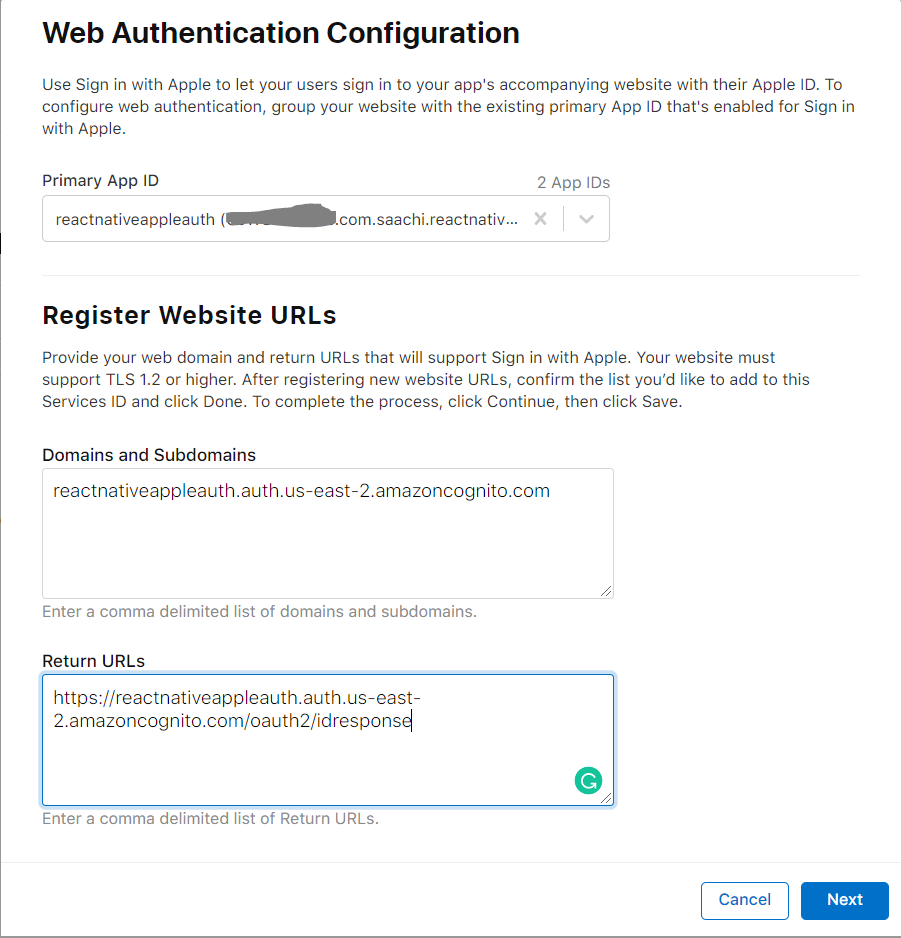
You will notice that we have removed https in front of domain. This is required by Apple. You will also notice that in return url we have added /oauth2/idpresponse in return url. This is required by aws to finalize authentication
Now click on “next” and verify your domain and then click on “done”. Click on “Continue”.
If everything is set up correctly you will see the following screen.
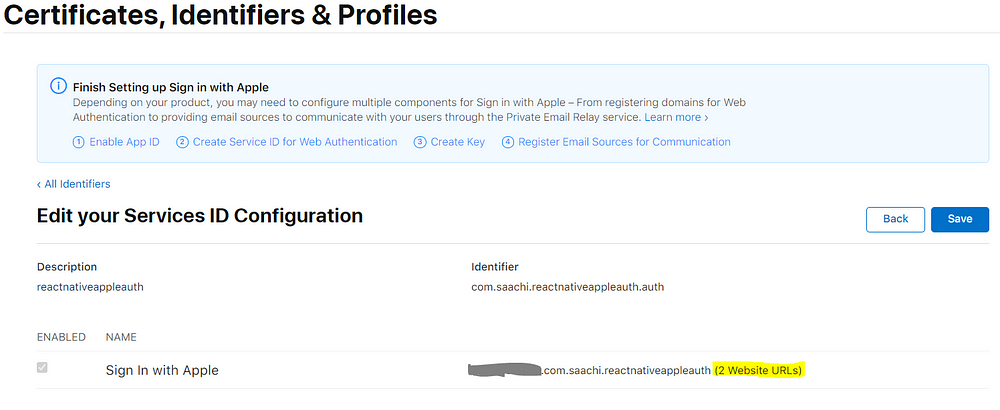
If you are satisfied with your settings, copy your service id identifier and Click on “save”.
Setup Apple Keys
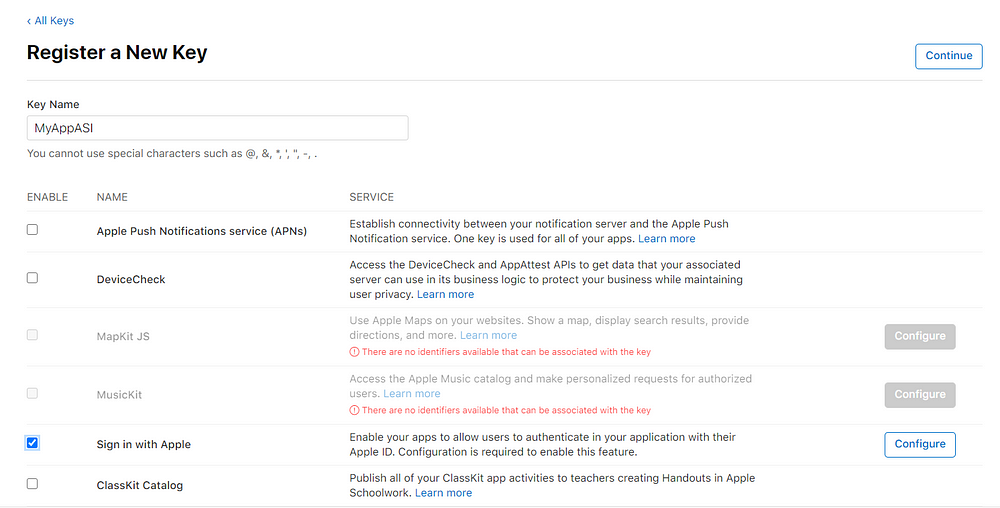
We now need to create an auth key which is required by UserPool. To do this navigate to “Keys” from the left menu.
On the “Keys” screen click on the + icon next to Keys. On this screen input a name for example myAppASI or anything you want. Enable Sign-in with Apple. Below is an example
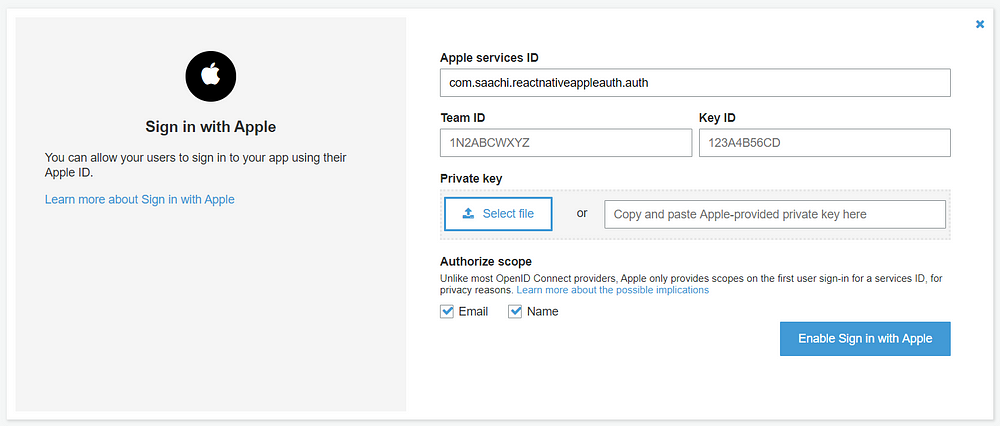
On the above screen click on Configure next to “Sign in with Apple”. Select Your app Id from the list and click on Save then “Continue” to the next screen and “Register”. You will get below screen

Download the key, which should be p8 file, and take note of Key ID. Click On done.
We are done with Apple configuration here. You should have reference of Team ID, Key ID and p8 file of your key now.
Let’s go back to Our User pool. We need to configure Apple Identity Provider. On your User Pool follow the below step.
Select “Identity providers” under the federation on the left menu. This will show you all the identities which AWS’s user pool support. We will set up Apple Sign-in now. Select “Sign in with Apple” and input your details in the form.
Input all the details we have gathered in Apple Configuration and upload the .p8 file. Click on “Enable Sign in with Apple” once you have finished all the required details.
You should get a success message saying “The identity provider has been updated successfully.”
Now we need to enable this in our app client. Navigate to “App client settings” under “App Integration” from the left menu and configure it as per the below screen and Save it.
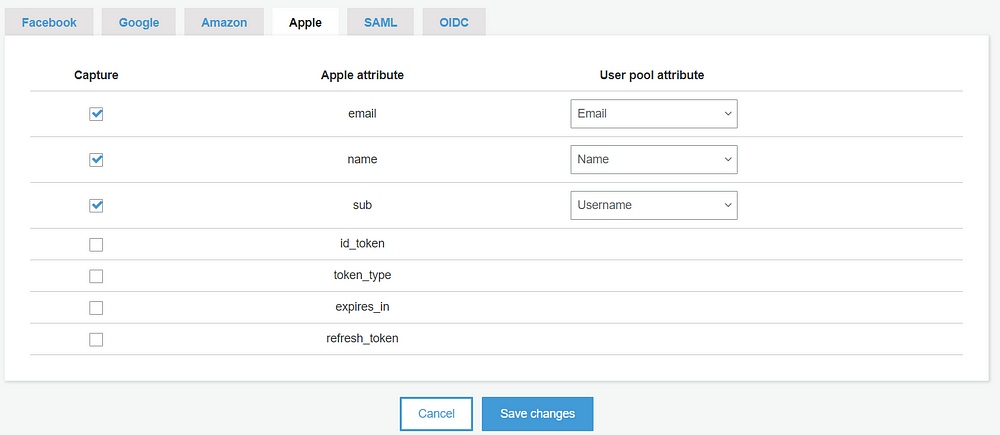
After this, we need to work on attribute mapping so we can correctly grab the Apple attribute with our Cognito attribute. You can do that by navigating to Attributes Mapping under the Federation on the left menu. Once you are happy with mapping click on done. Below is how I did the mapping.
We are done with User Pool for now.
Setup Cognito Identity
Let’s configure our Cognito Identity. Click on ‘Federated Identities’ and click on ‘create new identity pool’. Please follow the below step to setup Identity Pool
- Input any name of your choice. I will keep it similar to my app id.
- Leave Unauthenticated identities and Authentication flow settings.
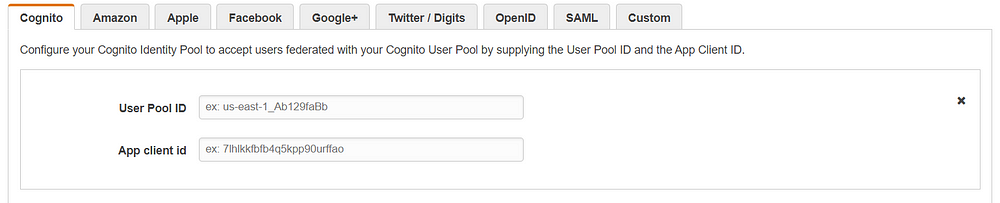
- Open ‘Authentication providers’. Here you can input all of your social provider’s details. We will only configure the Cognito and Apple.
- Input Pool Id and App client id which we have copied from our user pool for Cognito provider.
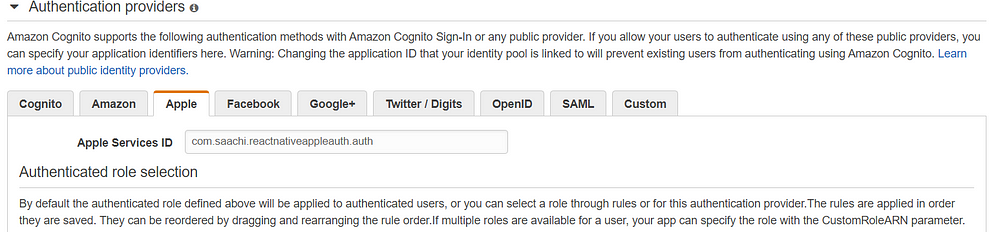
5. Select Apple and input Apple service Id. Please configure it as per the below screen.
6. Now click on “create pool”. This will redirect to IAM Service where you can create a new role for this identity pool or use any existing role. Then click on Allow.
7. Now our identity pool is ready. Copy the identity pool id. We will need this to configure our React-Native App. To grab the id, you need to edit your identity pool and then copy identity id.
We are done with our AWS and Apple configuration here.
Setup React Native App
Let’s create a new react-native app and enable login. Start with the following
react-native init ReactNativeAppleAuth
install required dependencies
npm i — save amazon-cognito-identity-js aws-amplify aws-amplify-react-native @react-native-community/netinfo react-native-vector-icons
Makes sure to run pod install in ios directory
Once you have everything set up, let’s create AWS configuration file and edit our App.js to allow us to sign in using Apple account
Create a new file, aws-export.js, in your project root, and insert the following values.
const awsmobile = {
“aws_project_region”: “<your project region>”,
“aws_cognito_identity_pool_id”: “<your identity pool id>”,
“aws_cognito_region”: “<cognito region>”,
“aws_user_pools_id”: “<user pool id>”,
“aws_user_pools_web_client_id”: “<user pool app client id>”
};
export default awsmobile;
Make sure you update it with correct values. Now let’s set up a social login page.
Create a new file socialLogin.js in your project root folder. Here is a snippet of the code
import React from 'react';
import { View, ActivityIndicator, TouchableOpacity, Image } from 'react-native'
import Auth from '@aws-amplify/auth';
import { withOAuth } from 'aws-amplify-react-native';
import FontAwesomeIcon from 'react-native-vector-icons/FontAwesome';
export default withOAuth(({oAuthUser,authState,oAuthError}) => {
  if (authState === "loading" || authState === "verifyContact"){
    return (<ActivityIndicator color={'#000000'} />)
  }
  const loginWithProvider = (provider) => Auth.federatedSignIn({provider: provider })
return (
<>
  <View style={{ flex: 1, width: '100%' }}>
   <View style={{ justifyContent: 'center', flexDirection: 'row' }}
    <TouchableOpacity onPress={()=>loginWithProvider('SignInWithApple')}>
    <View style={{ backgroundColor: '#000000', justifyContent: 'center', alignItems: 'center', borderRadius: 100, width: 44, height: 44 }}>
     <FontAwesomeIcon name={'apple'} size={24} color={'#FFFFFF'} />
    </View>
   </TouchableOpacity>
  </View>
 </View>
</>
);
});
All we need now to edit App.js so it can show the social login component and if Apple Auth is a success then we show protected pages of the application to the user. Let’s open App.js and replace it with following code
import React from 'react';
import { withAuthenticator, AmplifyTheme } from 'aws-amplify-react-native';
import { Image, View, TouchableOpacity, ActivityIndicator, Text } from 'react-native';
import SocialSignIn from './socialLogin';
import Amplify, { API } from 'aws-amplify';
import awsmobile from './aws-exports';
Amplify.configure({
 Auth: {
  region: awsmobile["aws_project_region"],
  userPoolId: awsmobile["aws_user_pools_id"],
  userPoolWebClientId: awsmobile["aws_user_pools_web_client_id"],
  identityPoolId: awsmobile["aws_cognito_identity_pool_id"],
  authenticationFlowType: 'CUSTOM_AUTH',
  oauth: {
    domain: 'reactnativeappleauth.auth.us-east-2.amazoncognito.com',
    scope: ['phone', 'email', 'profile', 'openid', 'aws.cognito.signin.user.admin',],
    redirectSignIn: 'reactnativeappleauth://oauth',
    redirectSignOut: 'reactnativeappleauth://signout',
    responseType: 'code',
    options: {
      AdvancedSecurityDataCollectionFlag: true
    },
  }
 }
});
class App extends React.Component {
 render() {
  return <View><Text>Success</Text></View>
 }
}
export default withAuthenticator(App,false,[<SocialSignIn />])
After setting up app.js we now need to set up XCode and add the URL schema we have given in the redirect URL of app client in the user pool.
Open your project in XCode and go to info settings. Scroll it until you find URL Types. Click on + icon and insert identifier which is your app id and URL scheme which is the scheme we have given in user pool/app client. For some reason, we have to set reactnativeappleauth instead of reactnativeappleauth://oauth
Now if you run your app, you will see the Apple icon on the screen and once you click on it it will open up the native browser and ask for your consent to allow the app to sign in using your Apple Account. Once you authorize it will show you a prompt in safari to open the app. Click on Open and it will take you to the application. This will now process your login and authenticate your app and show the protected content.
Setup Lambda for Auto Verification
We need to set up a few triggers to avoid the verification of a user. For this, we need to create a simple lambda node function with the following code
var aws = require('aws-sdk');
aws.config.update({region: 'us-east-2'});
const cognitoIdServiceProvider = new aws.CognitoIdentityServiceProvider({region: 'us-east-2'});

exports.handler = (event, context, callback) => {
  var params =  {
    UserAttributes: [
     {
       Name: "email_verified",
       Value: "true"
     }
    ],
    UserPoolId: event.userPoolId,
    Username: event.userName
  }
  cognitoIdServiceProvider.adminUpdateUserAttributes(params, function(err, data) {callback(null, event);});
};
Now go back to the app user pool and navigate to triggers. Here you can now select a lambda function for Post authentication and Post confirmation.
Now the accounts will be auto verified and added to your user pool directory.
I hope you like it. Please let me know if you have any questions. Thanks